MATLAB GUI for high-performance liquid chromatography
07. Marec, 2011, Autor článku: Kačur Michal, Elektrotechnika
Ročník 4, číslo 3  Pridať príspevok
![]() High-performance liquid chromatography (HPLC) is a chromatographic technique that can separate a mixture of compounds, and is used in biochemistry and analytical chemistry to identify, quantify and purify the individual components of the mixture. The most important measurement is realized on a slowly moving plate which is coated with out-flowing separated liquid mixture.
High-performance liquid chromatography (HPLC) is a chromatographic technique that can separate a mixture of compounds, and is used in biochemistry and analytical chemistry to identify, quantify and purify the individual components of the mixture. The most important measurement is realized on a slowly moving plate which is coated with out-flowing separated liquid mixture.
The problem that has to be solved is assuring either very slow movement of the plate or faster but not straight movement. In the last case, the accuracy and sufficient distance is important. So, the PC control of this process was designed. A physical model of the apparatus for HPLC was constructed at first on which it was possible to verify the control algorithm experimentally. Hardware used for connection between model and computer is the card NI USB-6008 and the Data Acquisition Toolbox is used for data acquisition and communication.
The control algorithm for coating of the liquid on the surface of the plate is programmed in the MATLAB. For simplicity, a graphical user interface (GUI) is developed in MATLAB software environment. It enables to set demanded parameters very simply and it is not necessary to be familiar with MATLAB commands for setting the parameters. The PC control of HPLC model using MATLAB and MATLAB GUI is effective and sufficiently fast and accurate. The results confirm that it is important to implement computerization process into various fields of research.
1. HPLC and hardware construction
High-performance liquid chromatography (HPLC) is a physicochemical separation method. It is one of the most modern analytical methods in analytical chemistry. Chromatography serves for identification and determination of a large quantity of organic and inorganic substances.
The key stone of chromatographic process is creating elution band by injection of sample of mixture to column. The chromatographic system includes three basic components, the mobile phase, sample and stationary phase. Very important part of the equipment is the detector that provides e.g. a characteristic retention time or UV spectroscopic data. Detector indicates the presence of a substance in the band from the column, but information about the specific composition of the sample gives a laser spectrometer. The liquid flow rate at the outlet of the capillary is very small. So, the plate on which liquid leaks out must move very slowly. The speed has to be approximately 1 mm.s-1 in a straight direction. Another solution is to create a non-linear trajectory where it is possible to increase the speed of the plate movement.
In the first phase of our work the equipment was created which simulated the plate on the HPLC. It enabled moving only in one direction and control was manual by a potentiometer and a commutator. By potentiometer, we could increase or decrease the speed of plate movement. The commutator changed the direction of the plate and could stop plate, too. In Figure 1, the model of HPLC is shown.
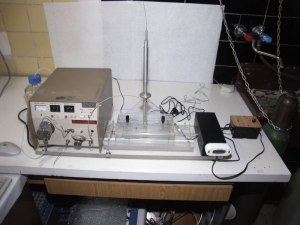
Figure 1 Laboratory model of HPLC
As the first model could move only in one direction and for some measurements the trajectory was short, it was necessary to develop another model which could move not only in one direction and the control was not manual. Based on these requirements, the new laboratory model was constructed. The basic mechanical skeleton of the equipment is shown in Figure 2. This object contains wooden board, electromotors with speed-reducing gear boxes, metal plates from furniture drawers and threaded rods.
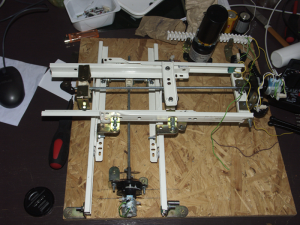
Figure 2 Basic mechanical skeleton of the model
After having the physical model of the HPLC, we needed to arrange the communication part of the equipment. Electronic components like electromagnetic relays, transistors, resistors, connecting blocks and cables were used as hardware for communication. In Figure 3, used electromotor with electronics is presented.
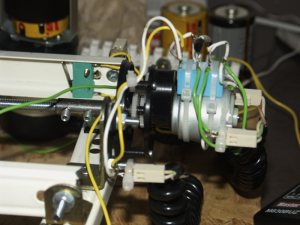
Figure 3 Electromotor with electronics
Cables from electromotor and from control electronics are connected to NI USB 6008 acquisition card produced by National Instruments Company. This card allows connection of the process model to the computer by USB port. The situation is shown in Figure 4.
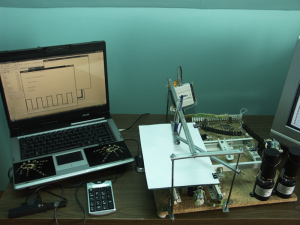
Figure 4 Connection PC card – process model
2. Matlab GUI
After connection of the process model to the PC, we started to develop graphic user interface (GUI) and control programs. GUI is very important for users as it is much simpler to enter parameters through GUI than to write commands in the MATLAB command window. GUI was created so that four various trajectories of the plate movement can be achieved (Figure 5).

Figure 5 Trajectories of the liquid application on the plate
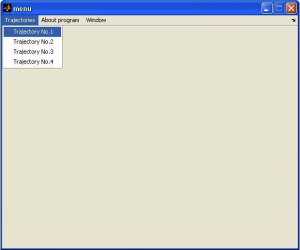
The first window of the MATLAB GUI enables user to choose the trajectory (Figure 6).
After the choice of the trajectory, the window for specific trajectory is open. Figure 7 shows the situation for the trajectory 1. The trajectory with important parameters is depicted at the bottom of the window.
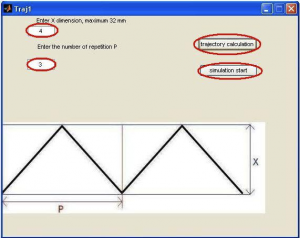
Figure 7 GUI for the trajectory 1
The window contains also two fields for parameter settings and two buttons. There are two necessary parameters for the trajectory 1, the X dimension and the number of repetitions. The values of these parameters set in fields are checked so that they can not exceed their maximal possible values and they have neither negative nor zero values. Entered values have to be given in millimeters and then they are converted to seconds because the control programs work with seconds. After the parameter setting, it is necessary to press the button “trajectory calculation”.
This button serves for checking the values of parameters. In the case when a parameter is greater than it is allowed or a parameter is negative or zero, an error occurs and user is informed about this error. In this case, it is necessary to change the parameters and to test them again. If the parameters are set correctly and no error occurs, the program can be executed by pressing the button “simulation start”. After that the called function enables to create the chosen trajectory on the plate. After the trajectory is created, the program sends the plate back to the start position and clears the inputs. Now, it is ready for using again.
All control programs are written using MATLAB commands and stored in M-files which run in the MATLAB environment. All algorithms and source program codes are stored in an attachment to the diploma thesis [1]. The function witch enables creating the trajectory is presented below. The block of commands is the same for all trajectories except of the first command which is specific for the chosen trajectory.
1 function trajektoria1 (X1,Y1,P_opak)

 2 dio = digitalio('nidaq','Dev1');

 3 hwline1 = addline(dio,0:1,0,'out',{'line1','line2'});

 4 hwline2 = addline(dio,0:1,1,'in',{'line3','line4'});

 5 display(dio)

 6 ao = analogoutput('nidaq','Dev1');

 7 addchannel(ao,0:1);

 8 putdata(ao,[3.0 3.0]);

 9 putsample(ao,[3.0 3.0]);

10 ai = analoginput('nidaq','Dev1');

11 addchannel(ai,0:3);

12 start(ai);

13 a1=getsample(ai);
Line 2 represents initialization of digital input – output object on the card. The specification of the card is in brackets. 3rd and 4th lines describe assignment of digital inputs and outputs to the created real object. Namely, two digital outputs called line1 and line2 are assigning to the variable hwline1 and two digital inputs called line3 a line4 are assigned to the variable hwline2. Line 5 displays configured ports as it is seen in Figure 8.
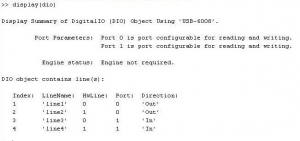
Figure 8 Result of the command display (dio)
Creating of analog outputs of the object is in line 6. In the next line, assignment of channels to the analog object is programmed. Next two commands express only sending 3 V signals to the channels. Analog inputs of the object are created on line 10. Assignment of analog inputs is defined by command on 11th line. The command start(ai) activates the analog input of the object. This object runs until it is not interrupted by stop(ai)command. And finally at the end of this program, the value from the card is loaded to the variable a1, which represents in fact the (1×4) matrix.
After setting and defining objects on the card, the assignment of values entered through GUI to the variables po, n, m, b can be done, as it is seen in the commands shown below.
po=P_opak;

k=0;

n=X1;

i=0;

ps=1;

m=Y1;

j=0;

b=0.5*n;

a=0;
Variables k, i, j and a serve like counters for individual cycles. So, these variables are set to zero before program starts. Variable ps represents number of seconds. The cycle for creating a half of trajectory is described at first. The reason for this fact is that it enables to center starting position of plate. The cycle contains these commands:
while (a<b)
 d=0;
 c1=clock;
 while (d<ps)
   c2=clock;
   if c2(6) < c1(6)
    c2(6) = c2(6) + 60;
   end;
   d=c2(6)-c1(6);
   putvalue(hwline1,[1,1]);
  end;
  m1=getvalue(dio.line3);
  m2=getvalue(dio.line4);
  if ((m1==1)||(m2==1))
   error1
   a=b;
   putdata(ao,[0 0])
   putsample(ao,[0 0]);
   k=po;
   n=0;
   m=0;
   po=0;
   b=0;
  end;
  a1=getsample(ai);
  a2=round(a1);
  b1=[-1 0 -1 -1];
  b2=[0 -1 -1 -1];
  b3=[-1 -1 -1 -1];
  b4=[0 -1 -1 0];
  b5=[-1 -1 -1 0];
  b6=[-1 -1 0 -1];
  b7=[0 0 0 0];
  if (a2==b1)
   error2
   ...
  elseif (a2==b7)
  end;
 a = a + 1;
end;
The cycle is the classical while cycle with a condition on the start. The body of the cycle is executed while the condition is not satisfied. The variable d is set to zero and to the variable c1, time is assigned from the computer. The inner cycle is the hearth of the program for every trajectory because the movement is controlled by time. Decision variable ps means the rate of the counter in seconds. If ps is set to 1 second, the cycle repeats every second while the condition is not satisfied. The condition if c2(6) < c1(6) handles time-passing through zero.
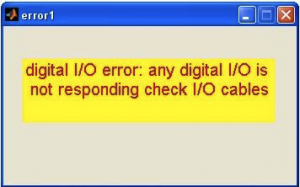
Command (hwline1,[1,1]) is used for sending logical one ore zero to the electric motor relay. These values determine direction of the electric motor rotation. Variables m1 and m2 serve for checking of cable disconnection. Logical one or logical zero is loaded to these variables, which means in fact 0 or 5 V. The voltage is sent to the electric motor relays by cables. In the situation when one or more cables are disconnected, the condition is satisfied and commands outlined by yellow color are executed. These assure electromotor abortion, program termination, setting all cycles to zero and error message displaying (Figure 10).
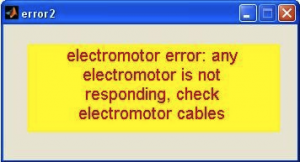
Then the electromotor operation is checked. This is realized by variable a1 in which the momentum voltage of the electromotor is loaded. The values is rounded and saved in the variable a2. Variables from b1 to b7 represent all states/failures which can happen in the cycle. State a2 is compared with states b1 to b7 and this situation is outlined by the turquoise color. These conditions contain the same set of commands (outlined by yellow color) as conditions for digital inputs. If one of the states b1 to b7 occurs then motor will stop, all cycles are set to zero, program terminates and the error message is displayed (Figure 11)
If no error messages occur then counter of cycle will increase and the cycle ends when condition is satisfied. Next cycle is the one with condition k<po, where po is variable that has information about the number of the trajectory. Variable k is the counter to variable po. Next cycles create the main part of the trajectory. These contain conditions i<n a j<m. These cycles are similar to the cycle for creating a half of trajectory. Differences between these two types of cycles are in variables and in sets of states/failures which can happen and are caused by the type of the trajectory or the direction of the electromotor rotation.
If these two cycles are running with no errors, counter k is increased. If the condition k<po is satisfied and the trajectory is created then it is necessary to return on the start position. Assuring of this movement is done by two cycles. But, auxiliary variables have to be defined at first using following commands:
sucet=((n+m)*po)+(0.5*n);

pocet=0;
Variable pocet is set to zero at first and then the cycle with pocet<sucet is executed. It means the cycle is running until the condition is satisfied. Commands:
putvalue(hwline1,[0,0]);

putdata(ao,[3.0 0])

putsample(ao,[3.0 0]);
change direction of the electromotor rotation and the second electromotor turns off. This cycle contains commands for electromotor monitoring and error messages, too. Using the cycle, the straight trajectory is created and then it is necessary to move to the starting point that lies on the normal to the straight trajectory in the distance equal to the starting cycle. The last cycle contains these commands:
putvalue(hwline1,[0,0]);

putdata(ao,[0 3.0])

putsample(ao,[0 3.0]);
After that the roles of electromotors changed. The electromotor which ran is turned off and electromotor which was turned off works now. Last commands are following:
stop(ai);

delete(ai);

clear ai;

putvalue(hwline1,[0,0])

putdata(ao,[0 0])

putsample(ao,[0 0]);

clear all;

stop(ai)
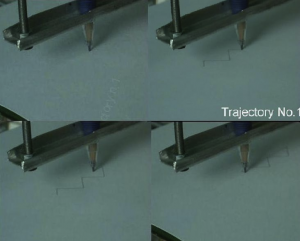
The command stop(ai) assures terminating of the analog input object. Command delete(ai) clears the finished object from the MATLAB workspace. Next three commands set digital and analog outputs to zero and it means the electromotors will stop. The total end is represented by the commnad clear all. The command deletes all objects from memory. The program execution is based on time. Time is loaded from the computer and using the above described cycles the whole trajectory of the plate movement is created (Figure 12).
3. Conclusions
Implementation of the model of the moving plate for HPLC was connected with any problems. These problems were mainly mechanical, but it was possible to use the model for demonstration. Used electronics is cheap and simple. Acquisition card is mobile one because it is not inside the computer but connected by USB port. Created GUI is simple and easy to use.
Acknowledgement
The authors are pleased to acknowledge the financial support of the Cultural and Educational Grant Agency KEGA of the Slovak Republic under the grant No. 3/7245/09, the Scientific Grant Agency VEGA of the Slovak Republic under the grant 1/0365/08 and the Slovak Research and Development Agency under the project APVV-0040-07. The support by the grant No. NIL-I-007-d from Iceland, Liechtenstein and Norway through the EEA Financial Mechanism and the Norwegian Financial Mechanism is also highly acknowledged. This project is co-financed from the state budget of the Slovak Republic.
References
- M. Kačur. Informatization of analytical metods (in Slovak). Diploma thesis, Technical University of Košice, Faculty of Mining, Ecology, Process Control and Geotechnology, 2010.
Co-authors of this paper are M. Bakošová – Slovak University of Technology in Bratislava, Faculty of Chemical and Food Technology, Institute of Information Engineering, Automation and Mathematics and J.Terpák -Technical University of Košice, Faculty of Mining, Ecology, Process Control and Geotechnology, Institute of Control and Informatization of Production Processes
